Connecting to Database from JSP
Database is almost a must-have component in dynamic web pages or applications. And this time I am focusing on the connecting to database from JSP using JDBC.
JDBC stands for Java DataBase Connectivity. JDBC is the Java API for connection to relational databases. In order to connect to the relational database from the JSP page, the JDBC driver must be first installed in the right place. I am illustrating this using both the plain way and the IDE way for connecting to the MySQL database.
For the plain way, I first put the JDBC driver mysql-connector-java-x.x.xx-bin.jar in the lib folder of the tomcat home directory and put a JSP file in the webapps folder. The JSP file is as follows ![]() :
:
<%@page import="com.mysql.jdbc.Driver" %>
<%@page import="java.sql.*" %>
<%
    Class.forName("com.mysql.jdbc.Driver");
    Connection conn = DriverManager.getConnection("jdbc:mysql://localhost:3306/test", "root", "");
    Statement stmt = conn.createStatement();
    try {
    final String sql = "SELECT * FROM one";
    ResultSet result = stmt.executeQuery(sql);
    while(result.next()) {
        out.println(result.getString(1));
        out.println(result.getString(2));
        out.println(result.getString(3));
    }
    } catch (Exception e) {
        out.println(e.getMessage());
}
    result.close();
    stmt.close();
    conn.close();
%>
In this way, the JSP file outputs all the records in the one table of the test database.
For the IDE way, I am using Netbeans and simply removing the code
<%@page import="com.mysql.jdbc.Driver" %>and
Class.forName("com.mysql.jdbc.Driver");for the JSP file, as Netbeans already has the JDBC driver included.
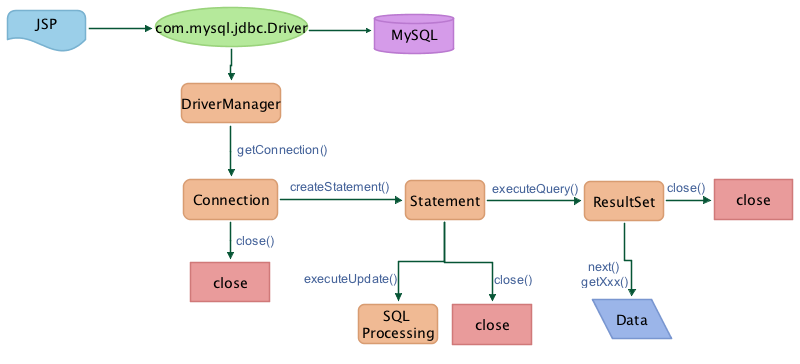
The two ways above ![]() are slightly different. However, they both follow the same flow chart as follows
are slightly different. However, they both follow the same flow chart as follows ![]() :
:
